Social Media Post Tutorial
- Social Media Post Tutorial
- Open the Social Media Post tool
- Choose a template or start from scratch
- Choose your social media platforms
- Tell Craftify AI what the post is about
- Pick your picture and call to action
- Fine-tune with Advanced options
- Craft your post
- Review and edit your post
- Choose how to publish
- Schedule your post on the calendar
- Find your post in the Calendar
Social Media Post Tutorial
This tool is powerful for creating effortless Social Media content for all of your channels in just a few easy steps. In this tutorial we will show you all of the features of this tool and how to use them, then we will show you how to publish your posts!
Open the Social Media Post tool
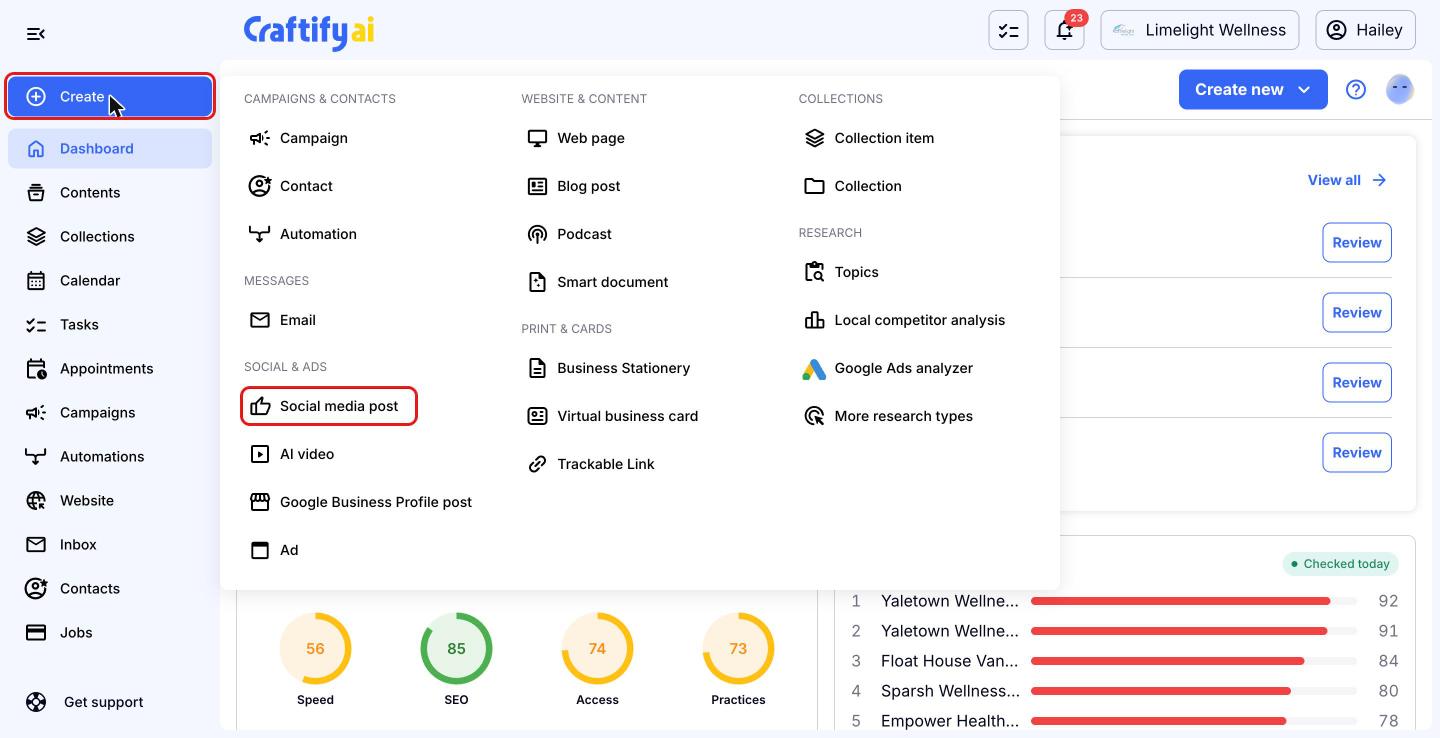
From your Craftify AI dashboard, click 'Create' at the top of the menu on the left. Under 'Social & Ads', choose 'Social media post'.
Choose a template or start from scratch
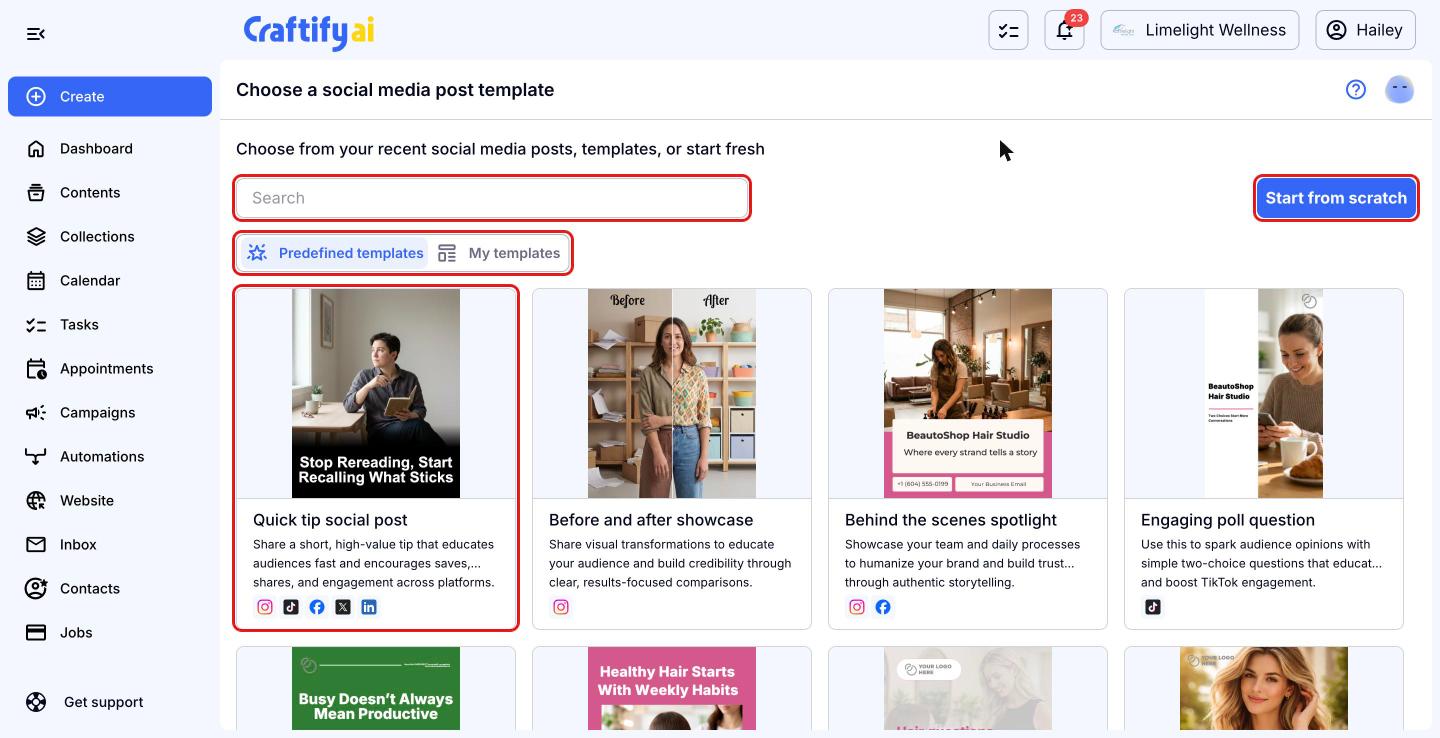
Pick one of the 'Predefined templates' to start from a ready-made post idea, or open 'My templates' to reuse one you've saved. The icons under each template show which platforms it's made for. You can also search for a template, or click 'Start from scratch' to build your own post.
Choose your social media platforms
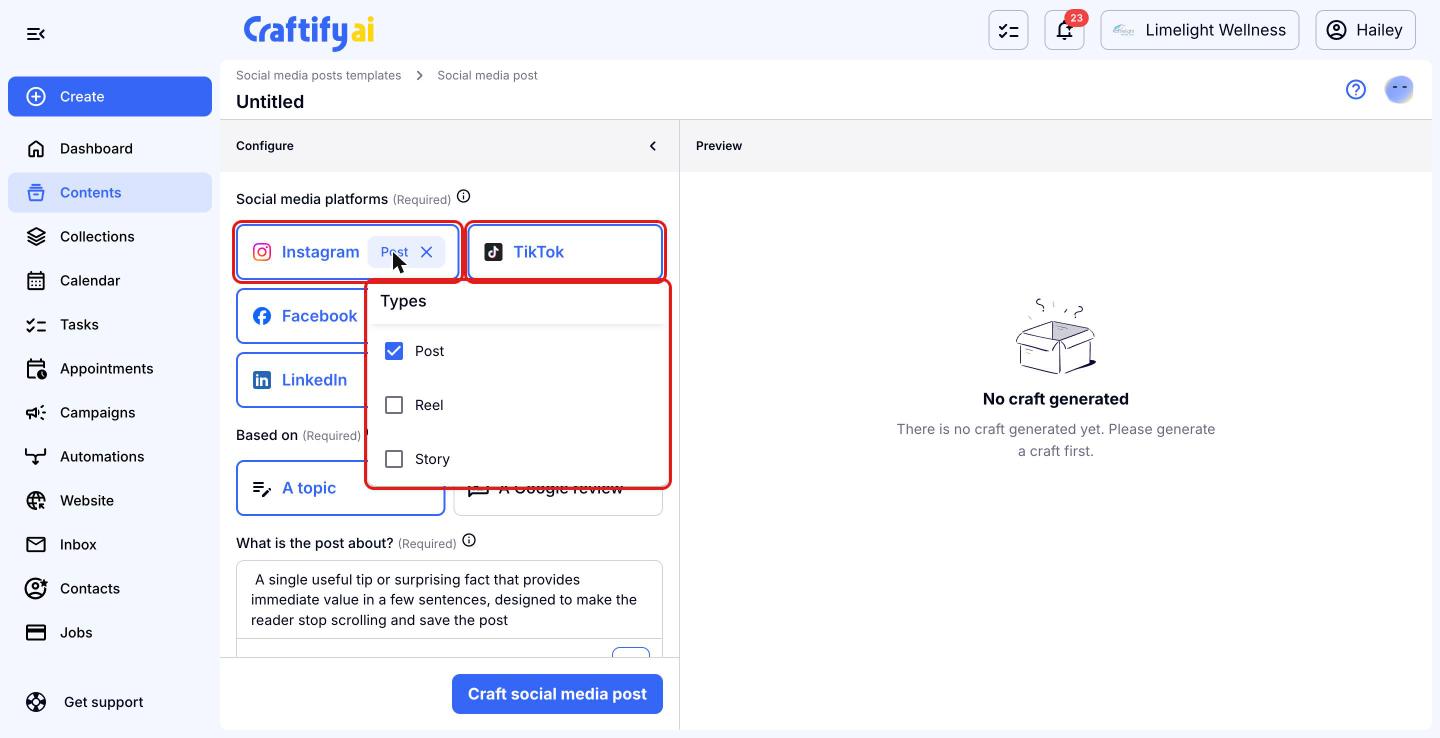
Under 'Social media platforms', click each platform you want a post for: Instagram, TikTok, Facebook, X or LinkedIn. Craftify AI optimizes the post for each one. For Instagram, click the small type label to choose a 'Post', 'Reel' or 'Story'.
Tell Craftify AI what the post is about
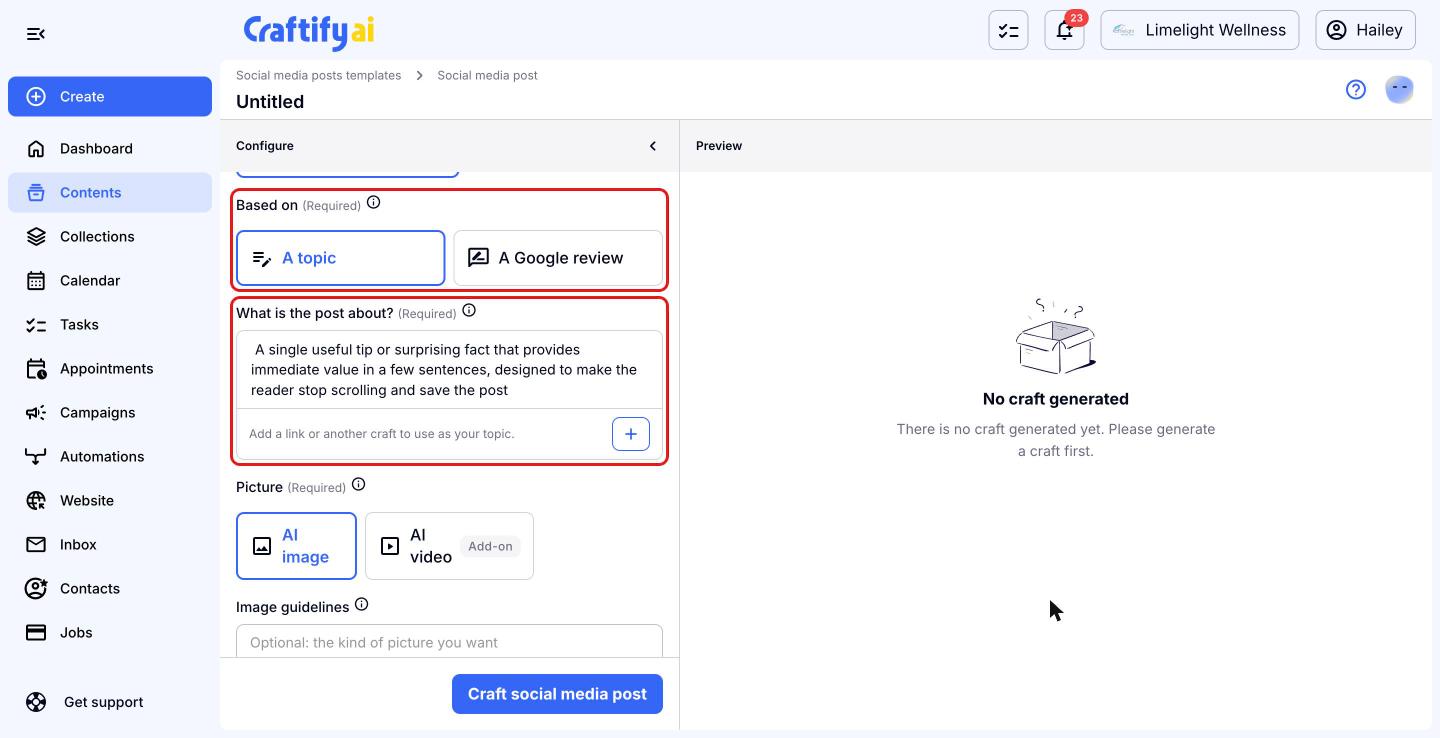
Under 'Based on', choose 'A topic' or 'A Google review'. Anything you bring is only inspiration; the words are always written fresh in your brand voice. Then describe your idea in 'What is the post about?'. Focus on the main ideas, not perfect wording. If you picked a template, this is filled in for you. Click the + button to add a link or another craft to use as your topic.
Pick your picture and call to action
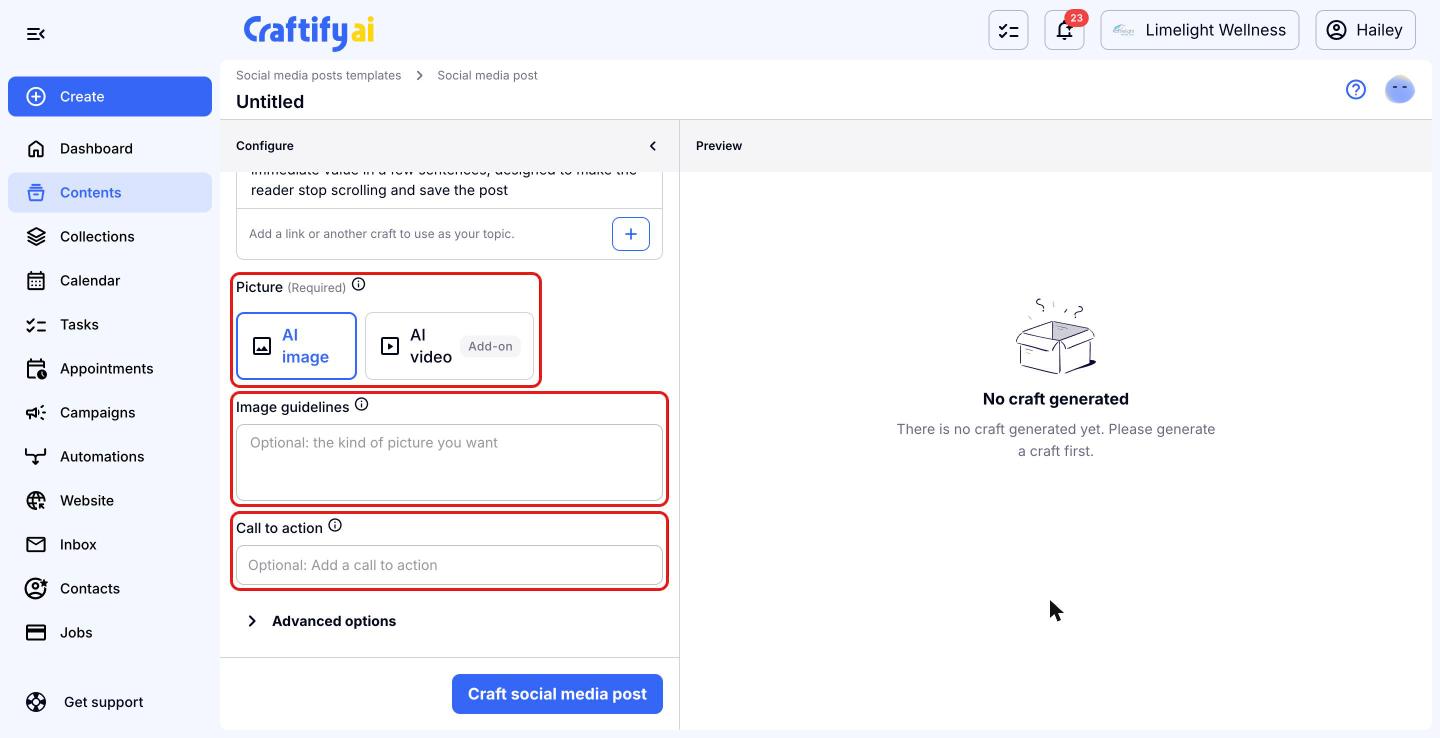
Under 'Picture', choose 'AI image' for one AI image or a carousel of images, or 'AI video' if you have the video Add-on. In 'Image guidelines' you can describe the picture you want, such as photorealistic, bright and airy, or no faces. Leave it blank and Craftify AI picks the best option for your post.
In 'Call to action', select or type what you want readers to do after reading your post, like booking an appointment.
Fine-tune with Advanced options
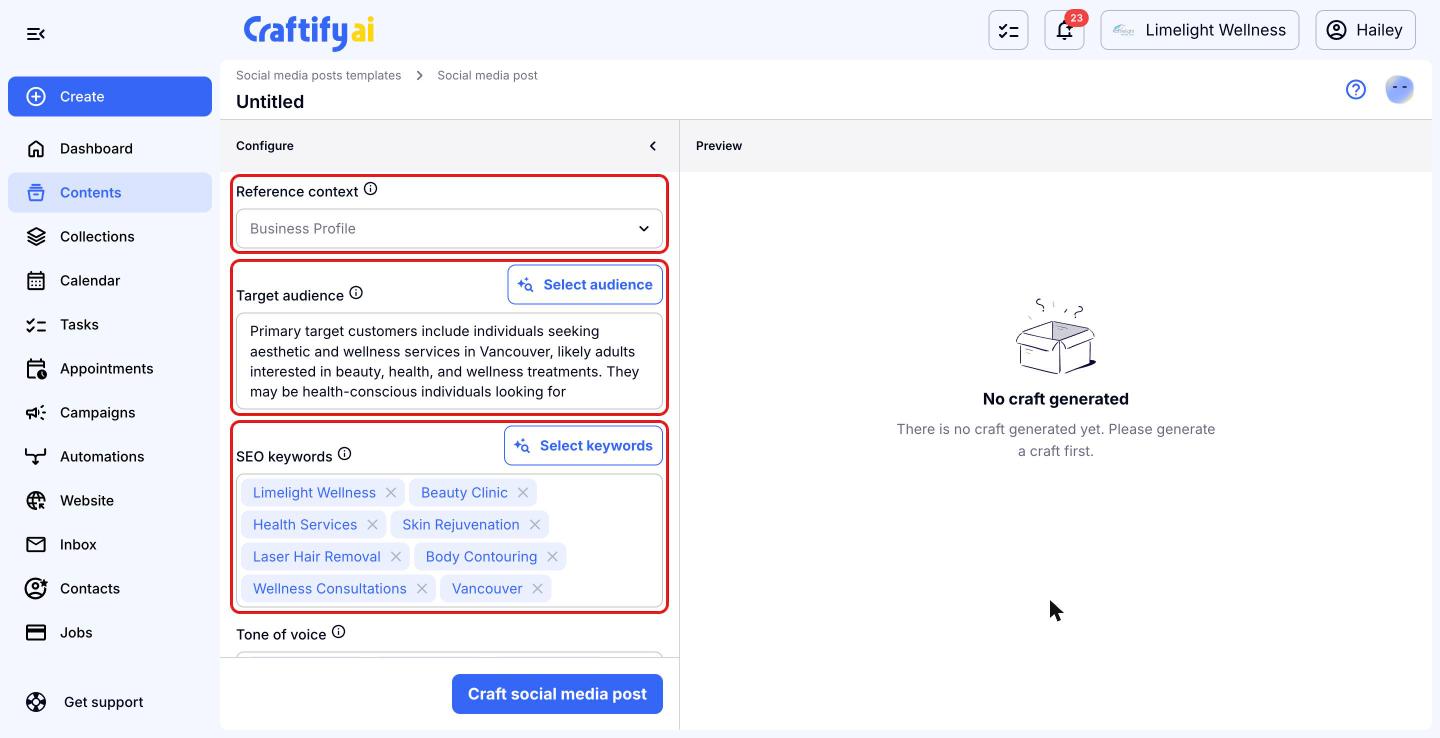
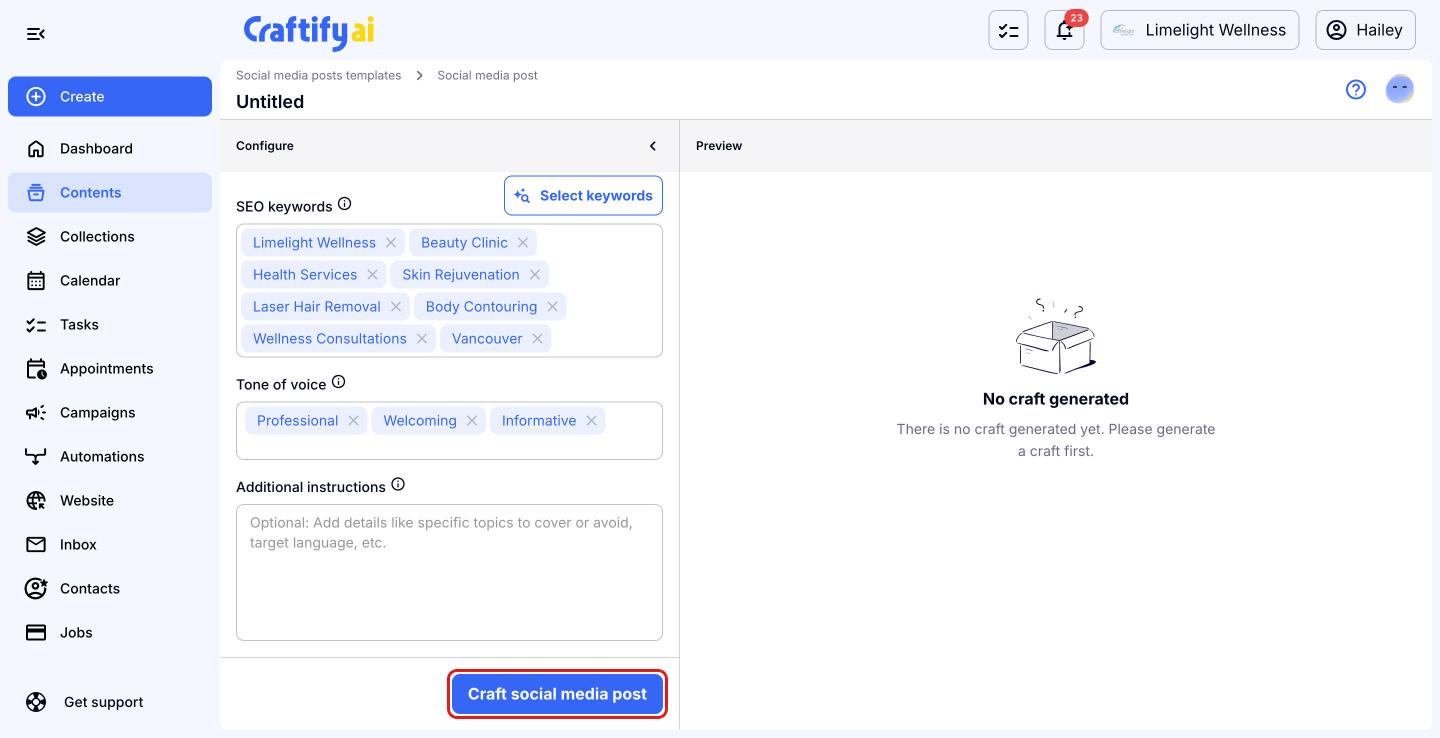
Click 'Advanced options' to adjust how your post is written. 'Reference context' (your 'Business Profile' by default) keeps the post in line with your brand. 'Target audience' tells Craftify AI who you are writing for, and 'SEO keywords' lists the keywords to optimize for. Use 'Select audience' or 'Select keywords' to pick from saved options.
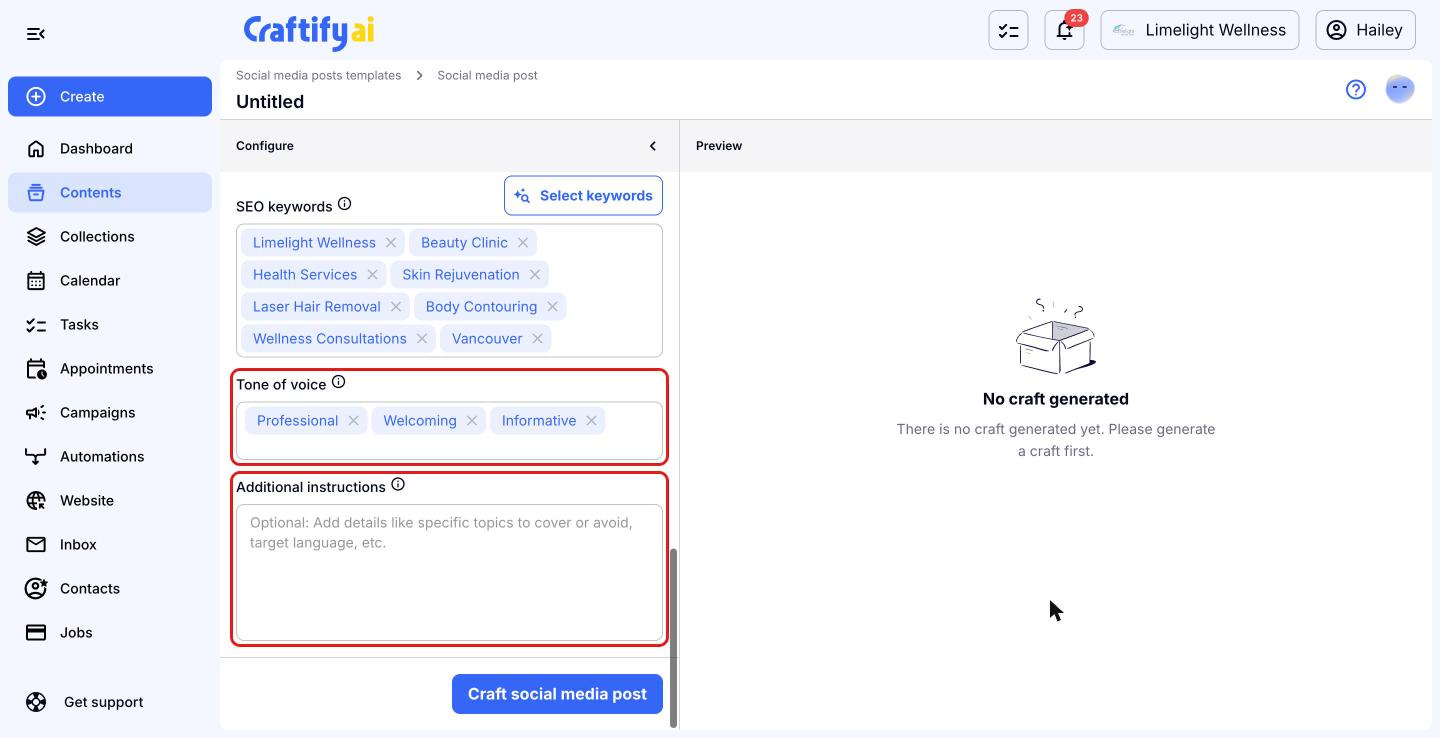
Scroll down to set the 'Tone of voice' for your post and add any 'Additional instructions', such as specific topics to cover or avoid, or the language to write in.
Craft your post
When everything looks good, click 'Craft social media post'. Craftify AI writes your caption and creates your picture, and shows the result in the 'Preview' panel.
Review and edit your post
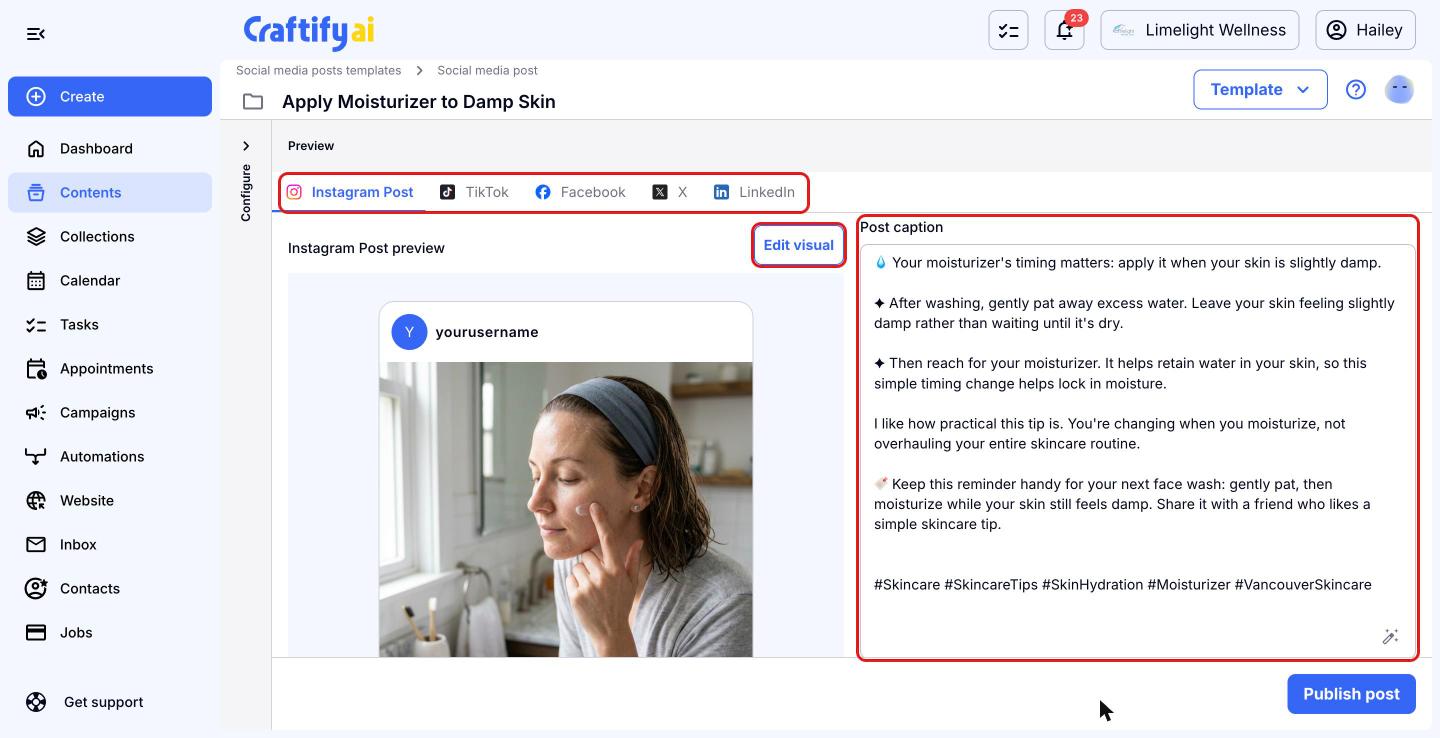
Your post opens with a preview for each platform. Click the tabs at the top, such as 'Instagram Post', 'Facebook' or 'LinkedIn', to see each version. Click 'Edit visual' to change the picture, and edit the 'Post caption' right in the box. The sparkle button in the corner lets you 'Enhance with AI'.
Choose how to publish
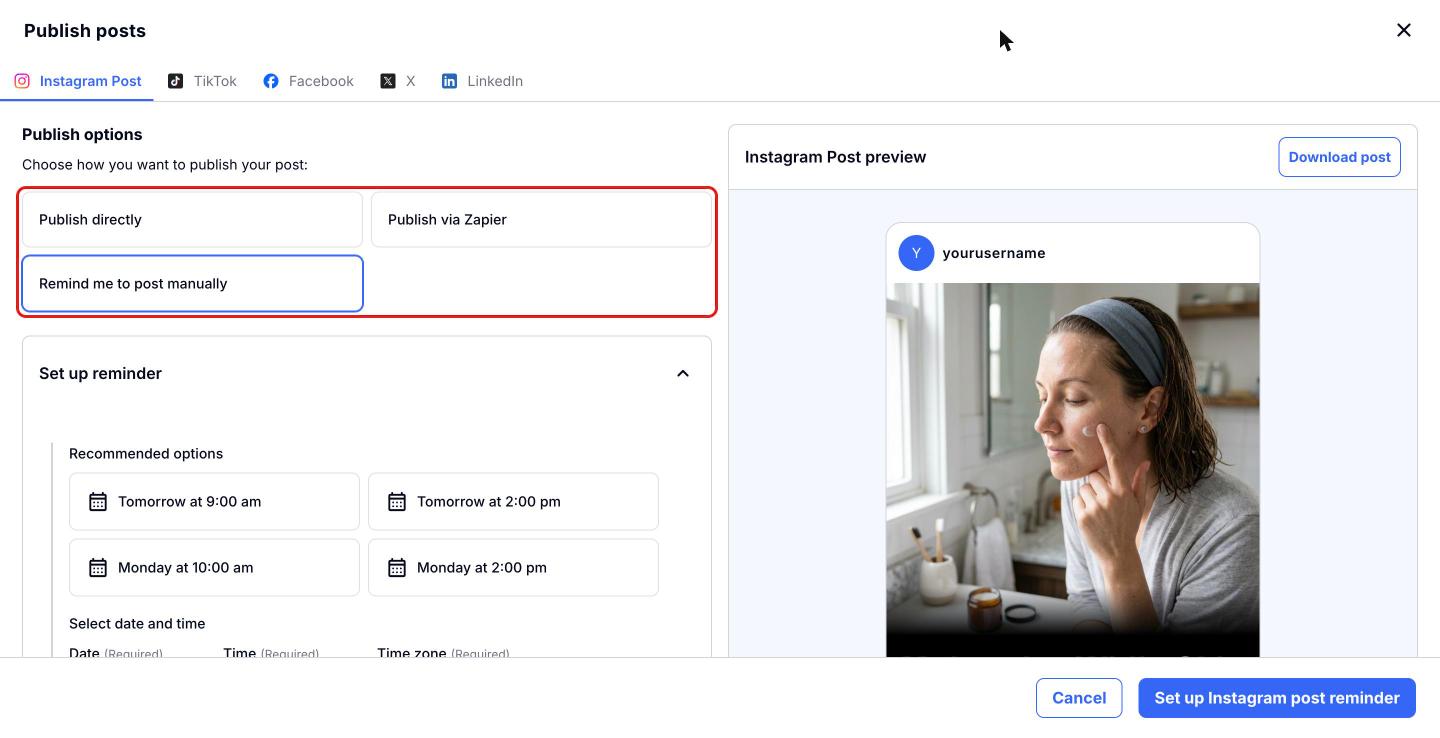
Click 'Publish post' at the bottom right. Under 'Publish options', choose 'Publish directly' to post to a connected account (click 'Connect' first if you haven't linked it yet), 'Publish via Zapier' to send it through a Zap, or 'Remind me to post manually' to save it to your calendar and post it yourself. Use the tabs at the top to set this up for each platform.
Schedule your post on the calendar
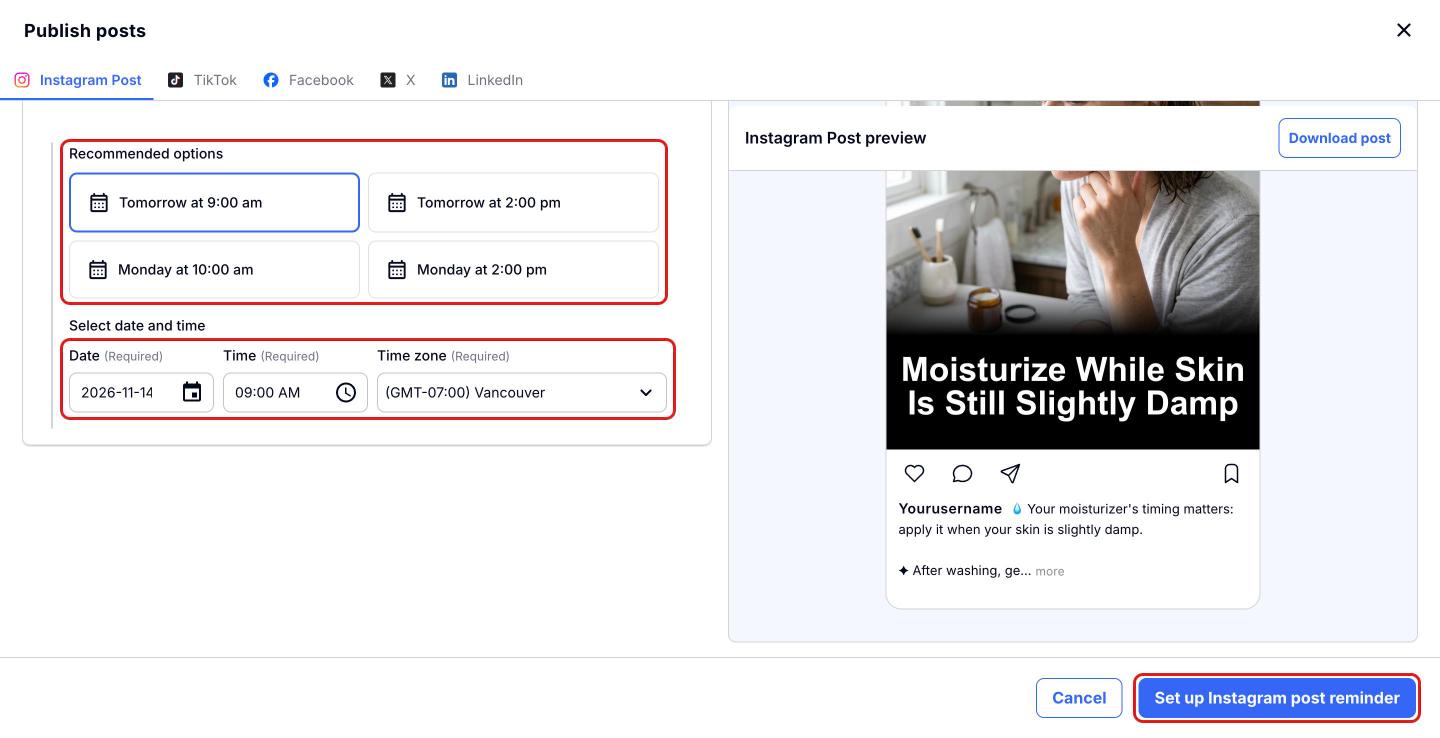
With 'Remind me to post manually' selected, pick a time under 'Recommended options', or set your own 'Date', 'Time' and 'Time zone'. Then click 'Set up Instagram post reminder'. The button name changes with the platform tab you're on.
Find your post in the Calendar
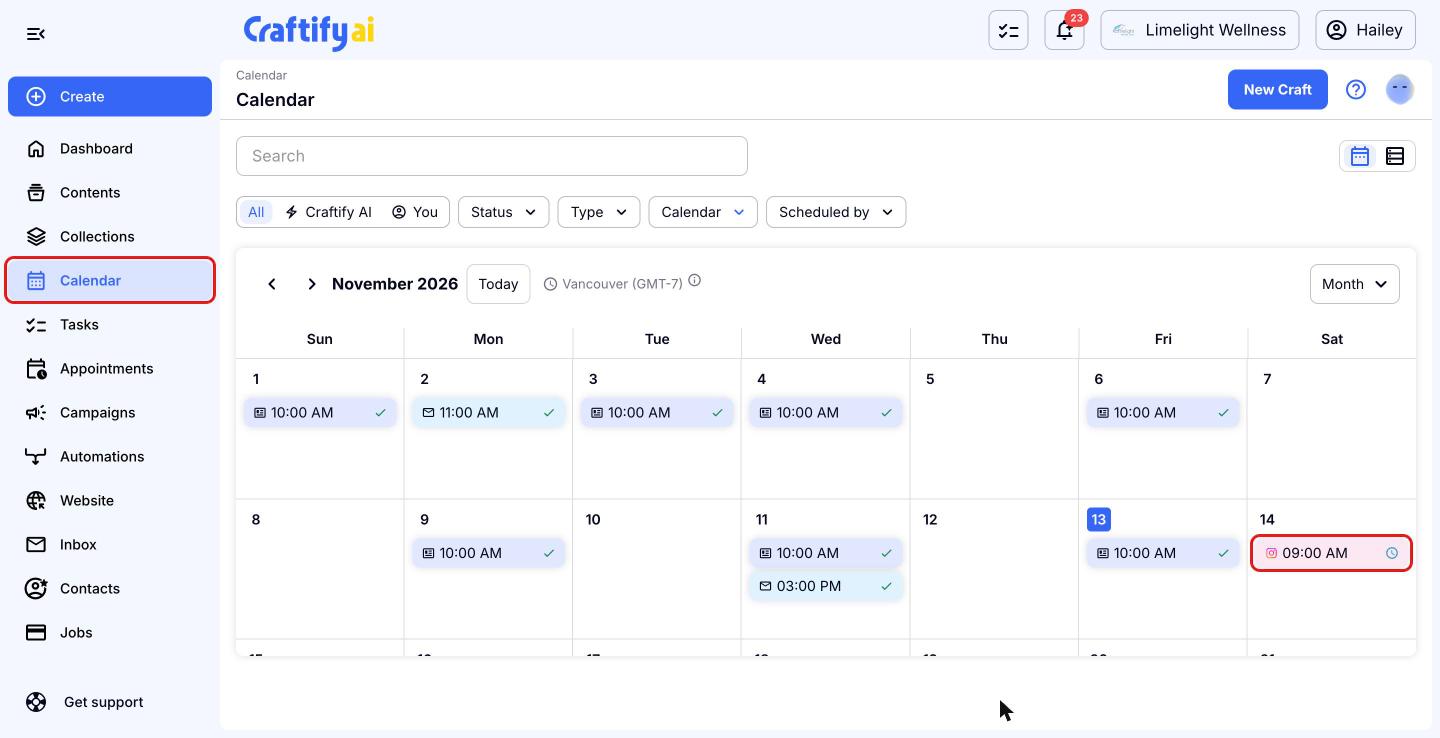
Click 'Calendar' in the left menu. Your scheduled post shows on the day and time you picked, with the platform icon and a clock to show it's still scheduled. Click it any time to open it, and post it when your reminder comes up.