Google Profile Tutorial
- Manage your Google Business Profile in Craftify AI
- Part 1: Profile
- Open your Google profile
- Check your profile score
- Work through your Fix list
- Review each part of your profile
- Update a section and save a draft
- Part 2: Reviews
- Open your Google reviews
- Reply to a review with AI
- Part 3: Posts
- See your Google posts
- Choose your post type and visuals
- Add your topic and a button
- Craft, review and publish your post
Manage your Google Business Profile in Craftify AI
Your Google Business Profile is often the first thing people see when they search for you on Google Search and Maps. In Craftify AI, the 'Google profile' page brings it all together in three tabs: 'Profile' to see how complete your listing is and fix the gaps, 'Reviews' to read and reply to your Google reviews with AI, and 'Posts' to create updates, offers and events for your profile. Follow along below to learn each part.
Part 1: Profile
Start with the 'Profile' tab to see how strong your listing is and what to improve.
Open your Google profile
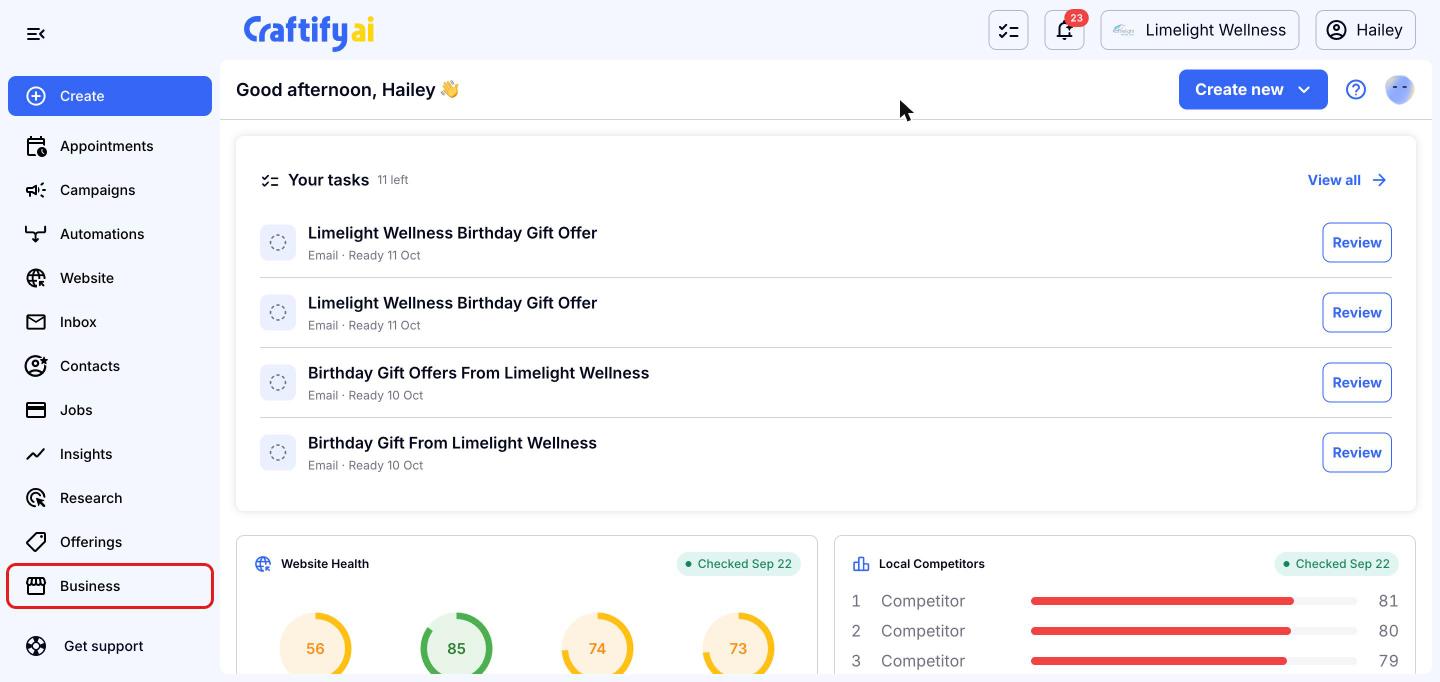
From your dashboard, click 'Business' near the bottom of the menu on the left. You may need to scroll down the menu to see it.
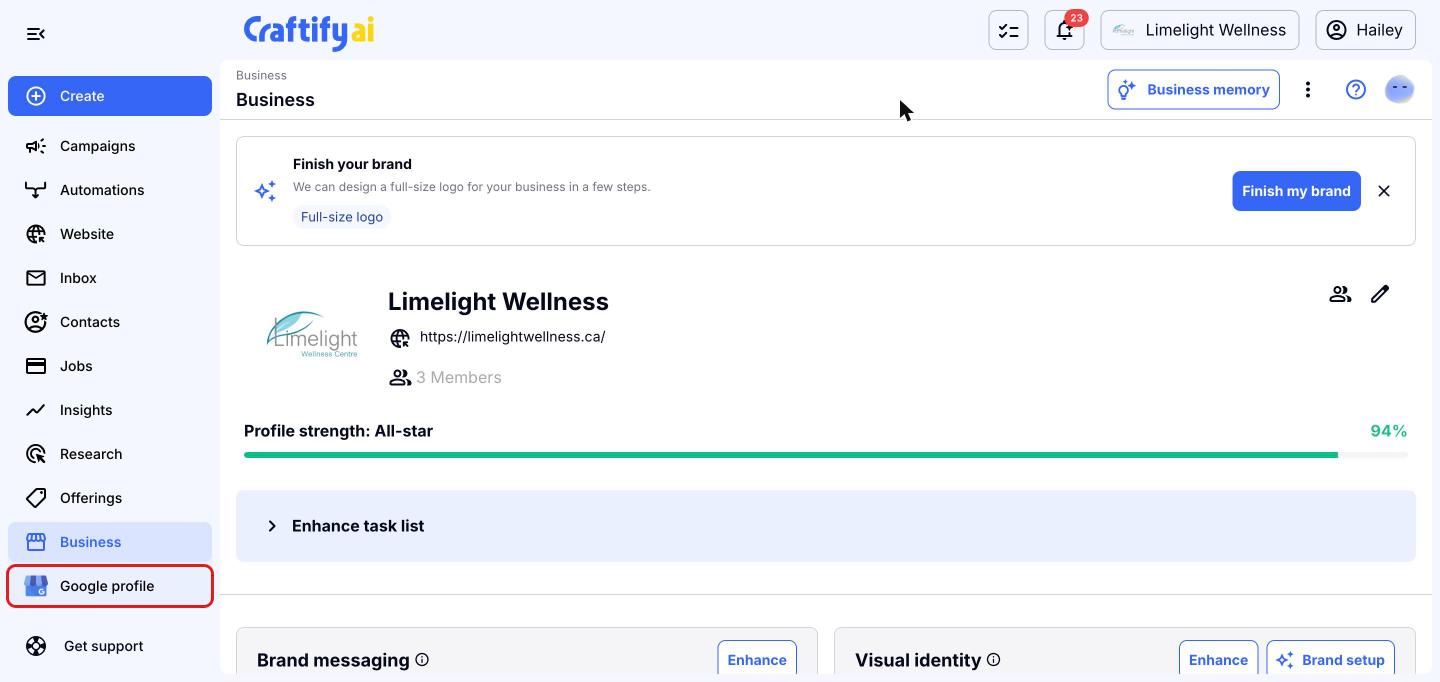
'Google profile' now appears just below 'Business' in the menu. Click it to open your Google Business Profile in Craftify AI.
Check your profile score
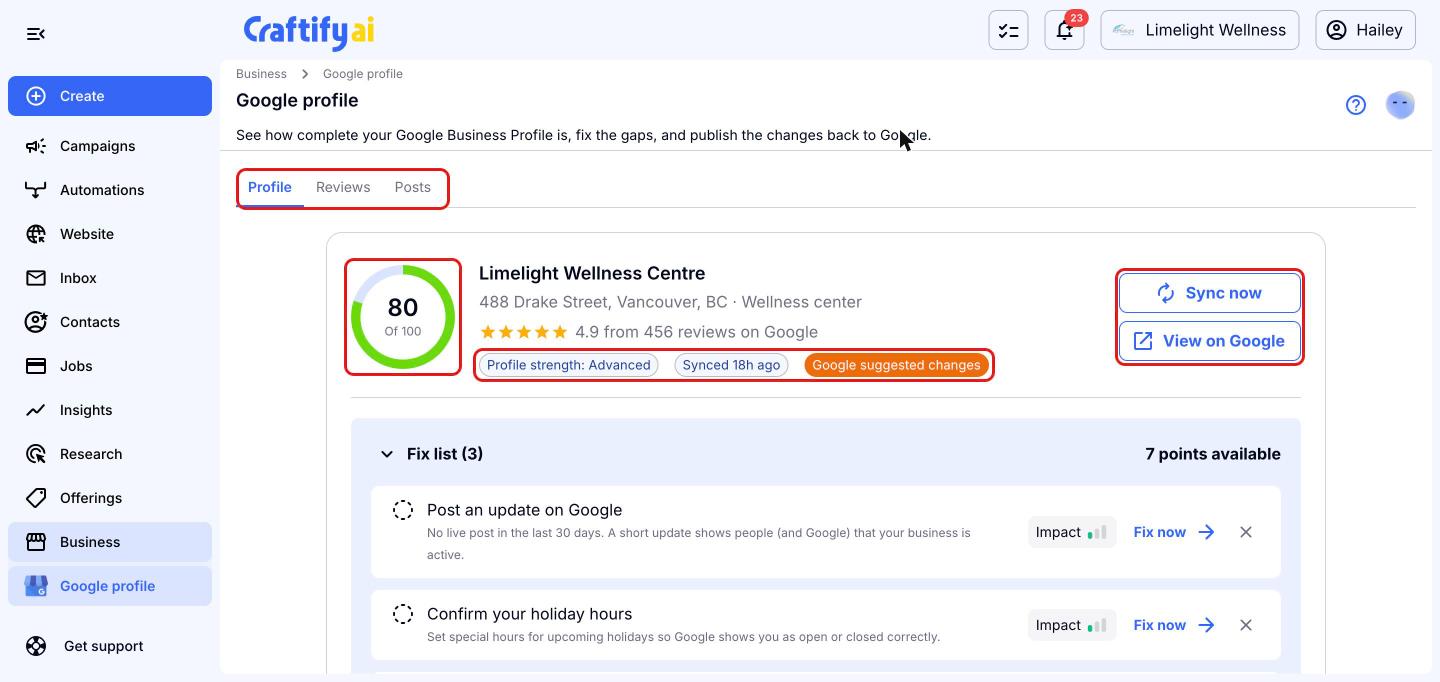
The 'Profile' tab opens first. At the top you'll see your profile score out of 100, your business name, address and Google rating, and badges showing your profile strength and when it last synced with Google.
Click 'Sync now' to pull in the latest details from Google, or 'View on Google' to see your live profile. Use the 'Profile', 'Reviews' and 'Posts' tabs to move between each part.
Work through your Fix list
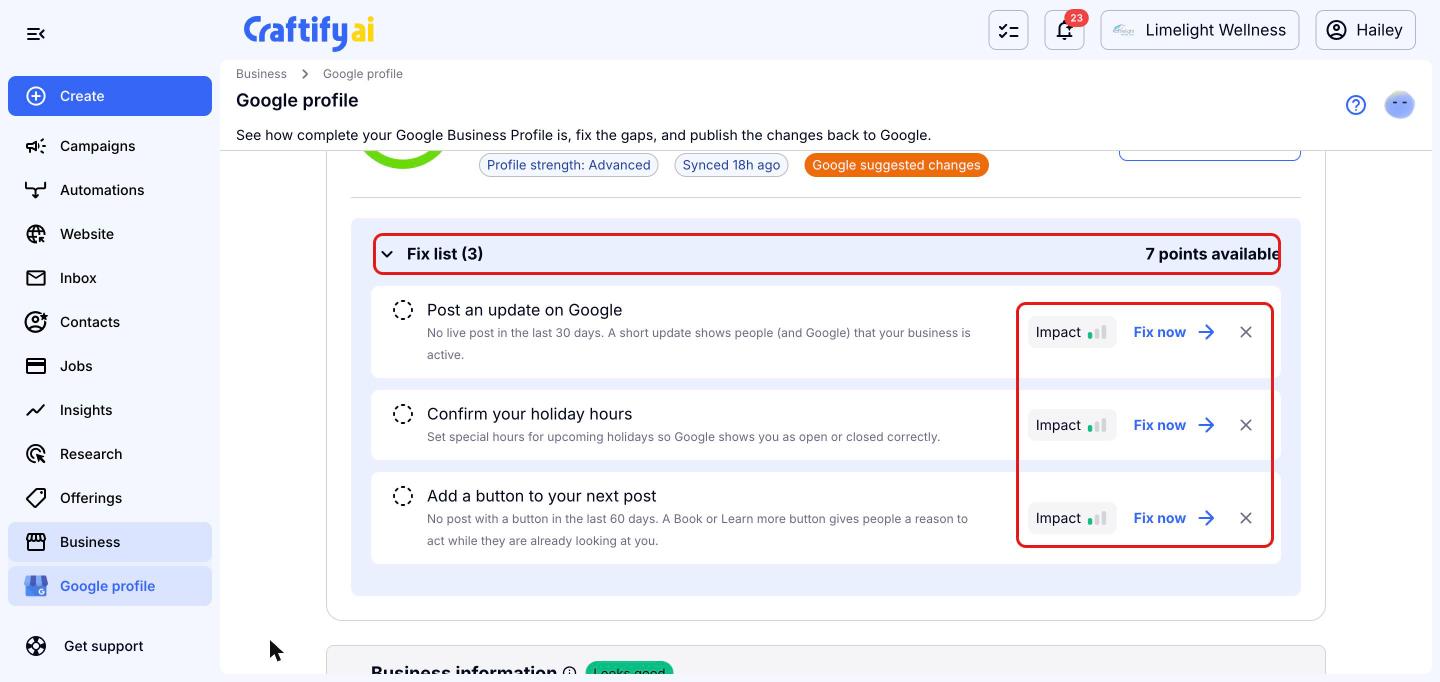
Below your score, the 'Fix list' shows the quickest ways to improve your profile and how many points are available. Each item explains what's missing, such as posting an update or setting holiday hours, with an 'Impact' rating.
Click 'Fix now' to jump straight to the right place to fix it, or click the X to dismiss an item you don't need.
Review each part of your profile
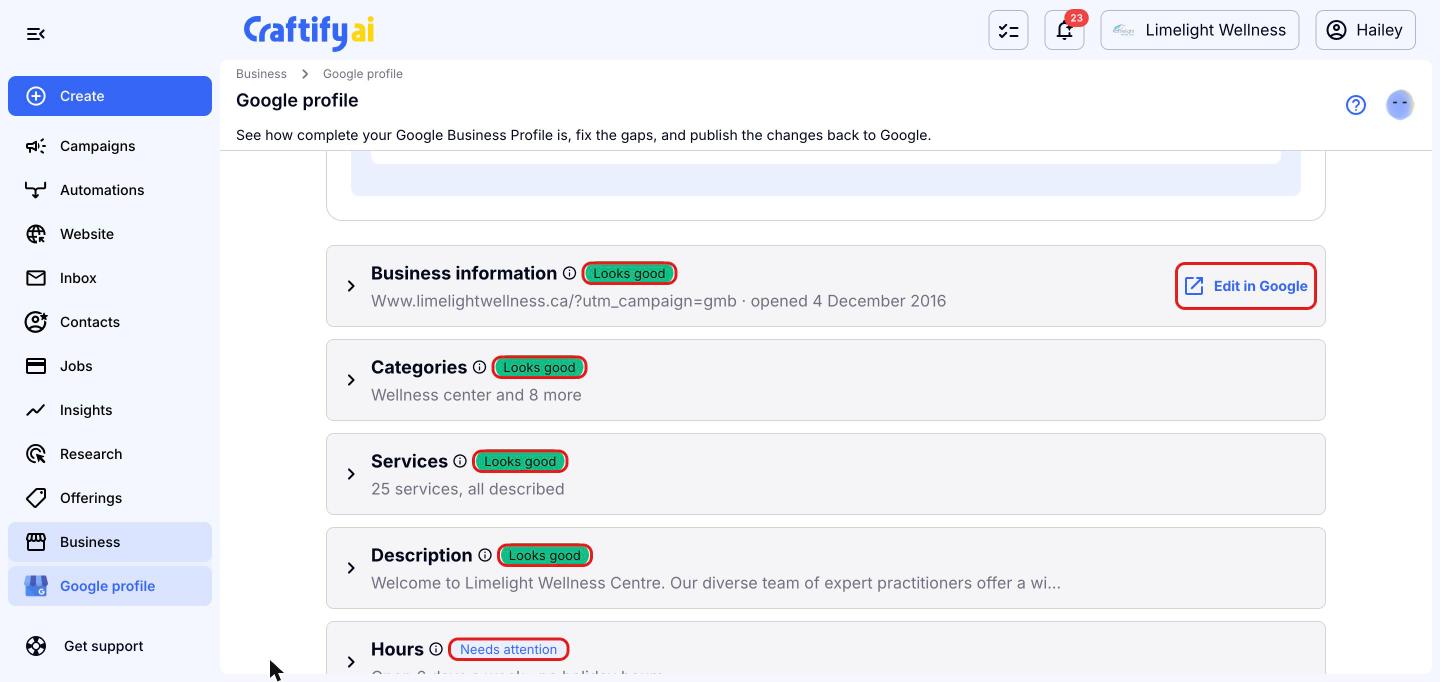
Scroll down to see every part of your Google profile: 'Business information', 'Categories', 'Services', 'Description', 'Hours', 'Service area', 'Attributes' and 'Labels'. Each one shows a summary and a status, such as 'Looks good' or 'Needs attention', so you know where to focus.
Hover over the ⓘ icon next to a section to learn why it matters. For example, categories are the strongest signal for which searches you show up in. Your business information is edited directly on Google, so click 'Edit in Google' to change it there.
Update a section and save a draft
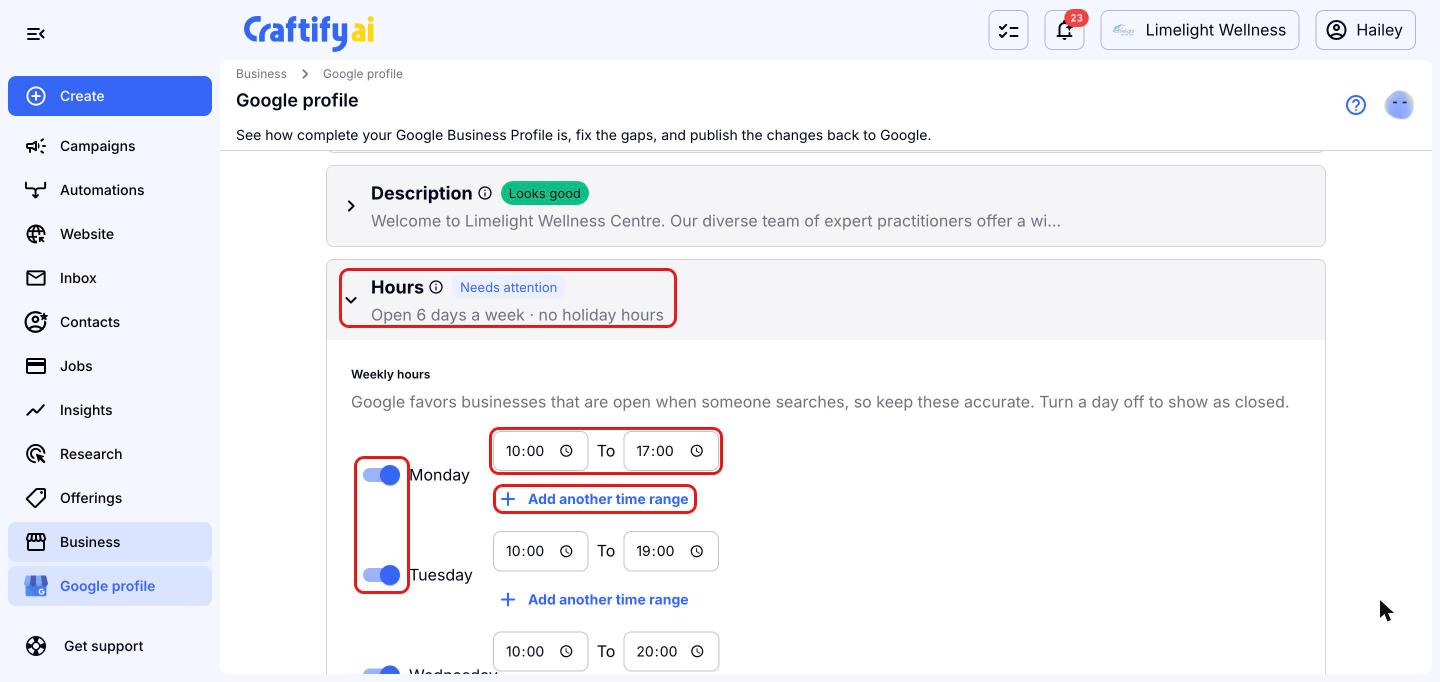
Click any section to open it and make changes. For example, open 'Hours' to update your weekly hours: use the toggle next to each day to show it as open or closed, change the opening and closing times, or click 'Add another time range' if you close for part of the day.
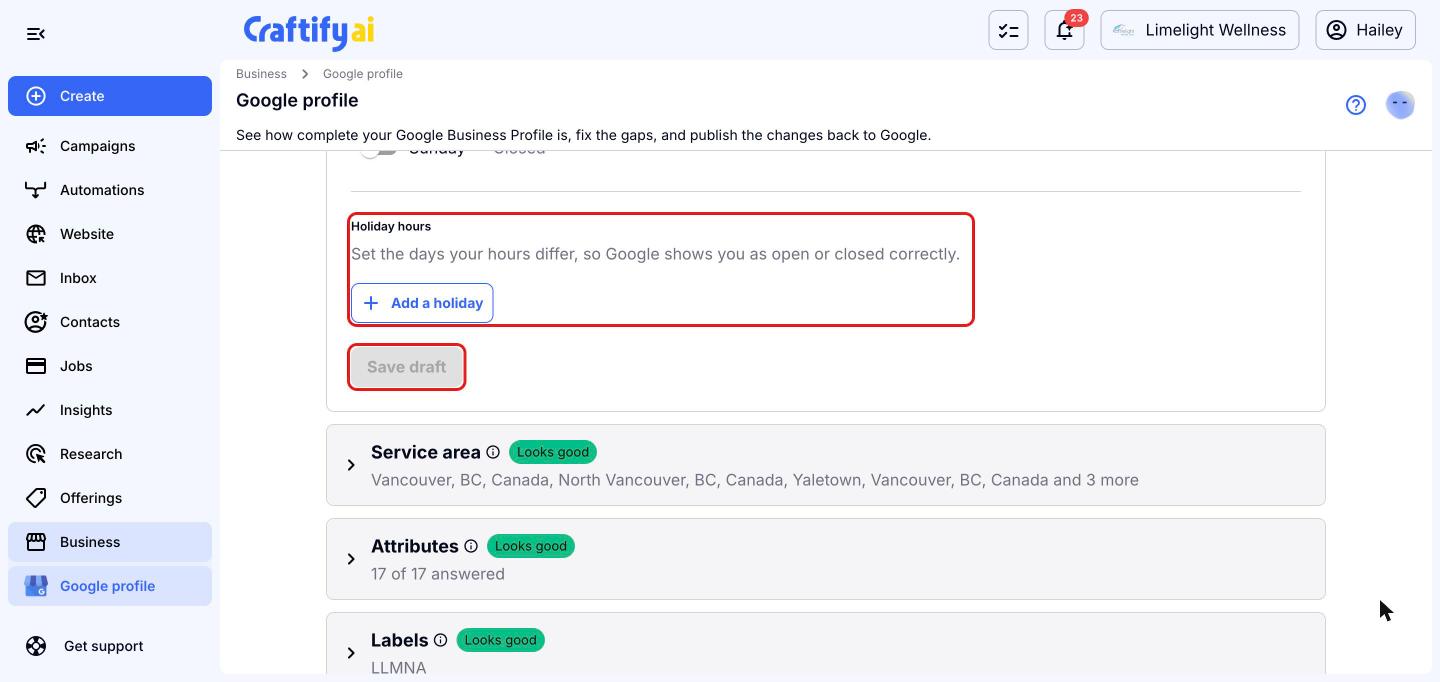
Scroll down to 'Holiday hours' and click 'Add a holiday' to set special hours, so Google shows you as open or closed correctly. When you're happy with your changes, click 'Save draft'. The button stays grey until you change something.
Part 2: Reviews
Use the 'Reviews' tab to read your Google reviews, reply with AI, and approve the replies your automations draft.
Open your Google reviews
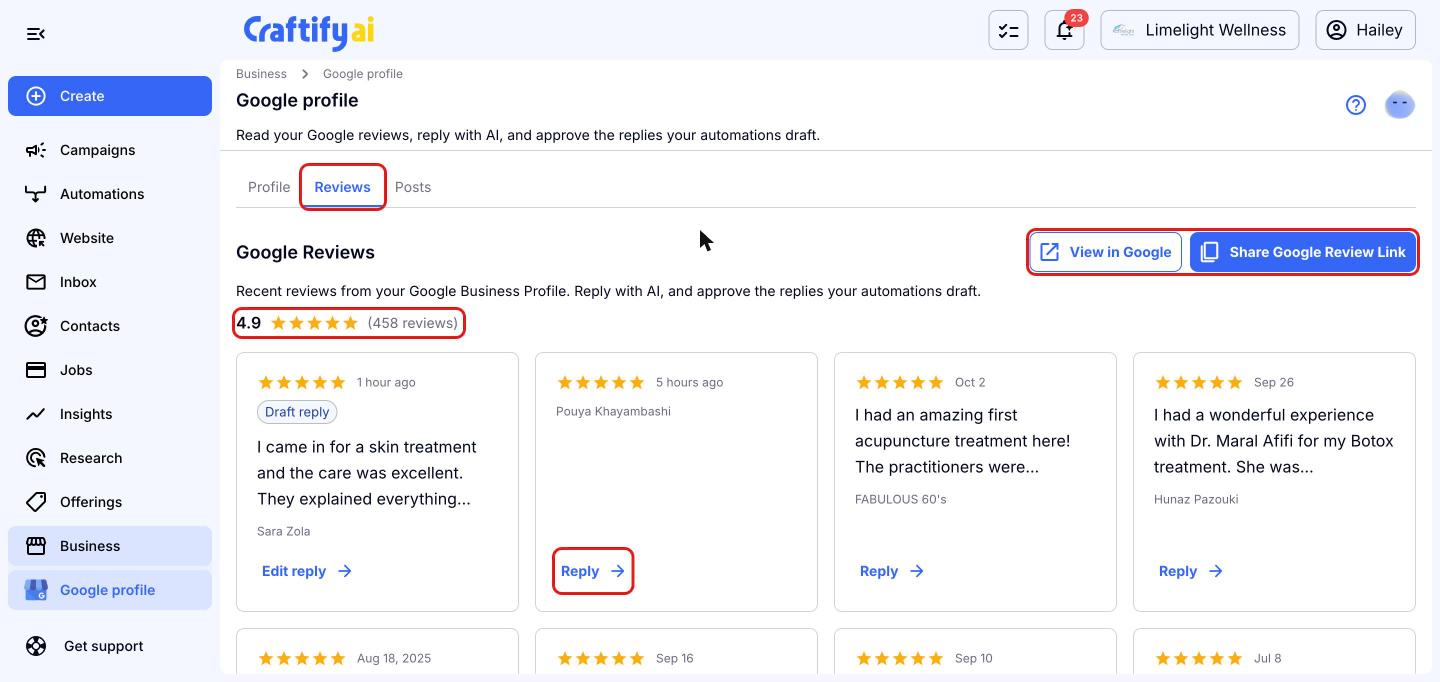
Scroll back to the top and click the 'Reviews' tab. You'll see your overall star rating and total number of reviews, with your most recent reviews shown as cards. Reviews you haven't answered show 'Reply', and reviews you've already answered show 'View reply'.
Click 'View in Google' to see your reviews on Google, or 'Share Google Review Link' to get a link you can send to customers to ask for a review.
Reply to a review with AI
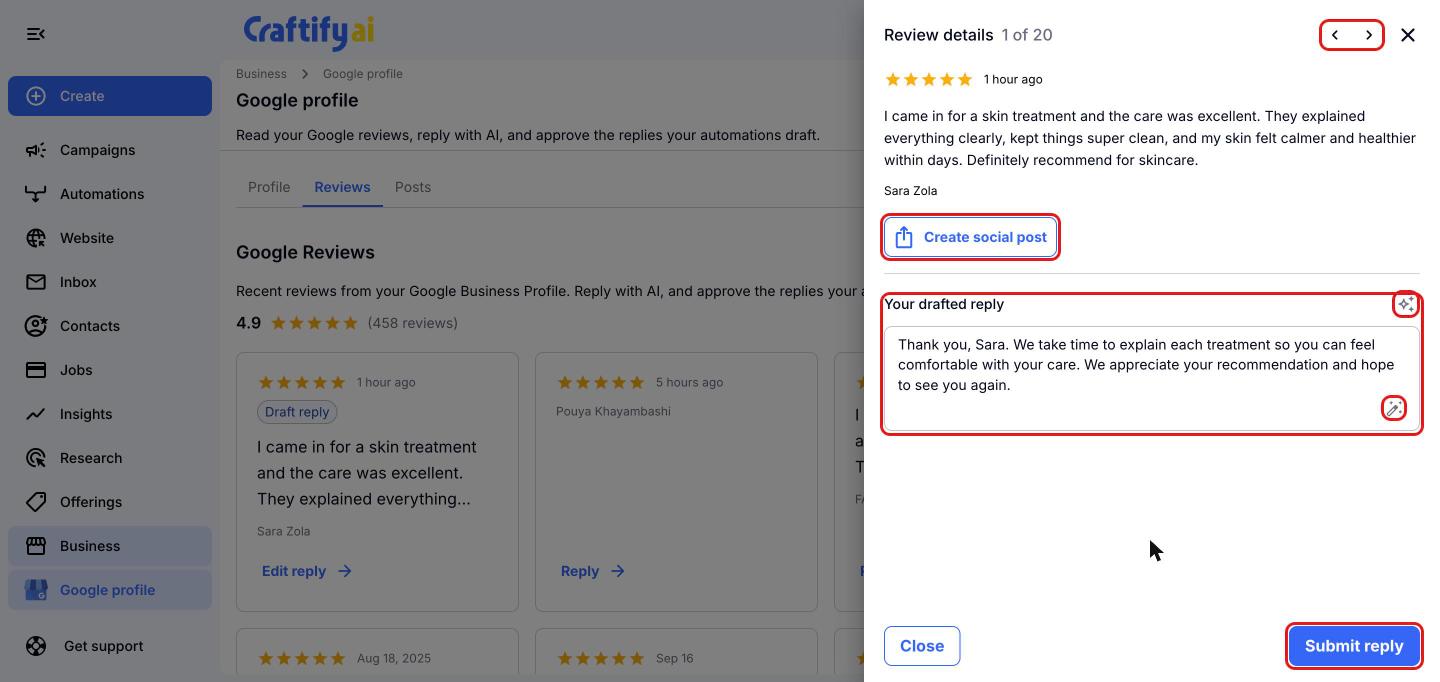
Click 'Reply' on any review. A panel opens on the right with the full review, and Craftify AI drafts a reply for you in the 'Your drafted reply' box. You can edit the text yourself, click the sparkle icon to 'Regenerate reply with AI', or click the wand icon in the box to 'Enhance with AI'.
When the reply looks right, click 'Submit reply' to post it to Google. Click 'Close' to come back later; the review will show a 'Draft reply' label and an 'Edit reply' button. Use the arrows at the top to move between reviews, or click 'Create social post' to turn a great review into a social media post.
Part 3: Posts
Use the 'Posts' tab to create updates, offers and events. Posts show up on your profile in Google Search and Maps, and a short update with a button gives people a reason to act while they are already looking at you.
See your Google posts
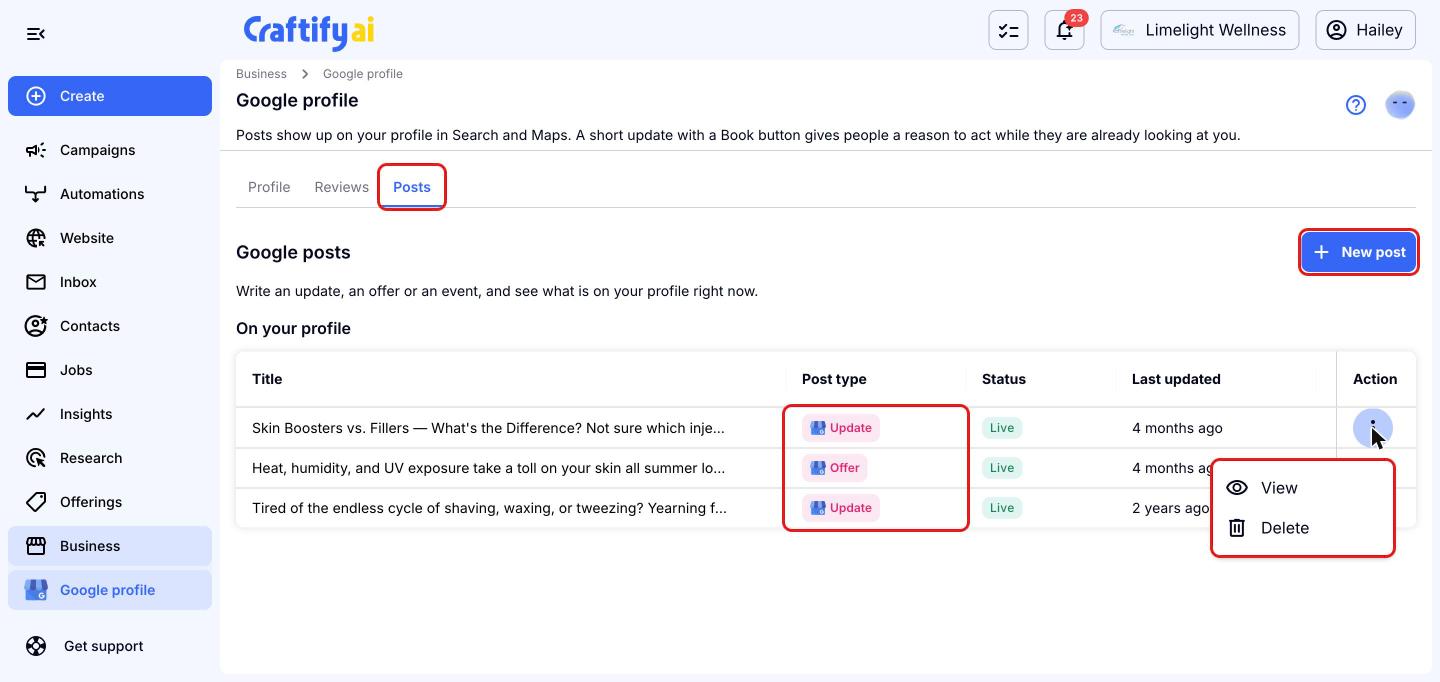
Click the 'Posts' tab. Under 'On your profile' you'll see the posts that are on your Google profile right now, with their 'Post type' (Update, Offer or Event), 'Status' and when they were last updated.
Click the three dots under 'Action' and choose 'View' to see a post on Google, or 'Delete' to remove it. To make a new one, click 'New post'.
Choose your post type and visuals
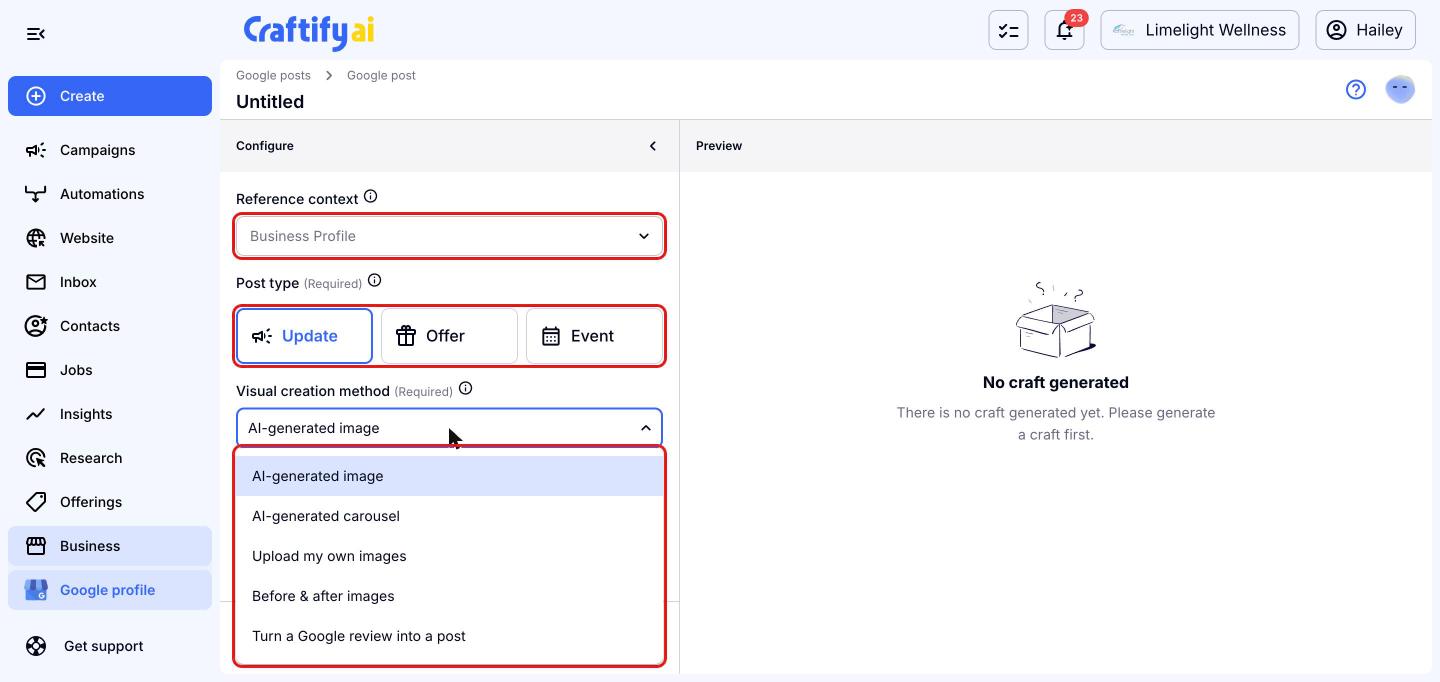
After you click 'New post', the post editor opens with your settings on the left and a preview on the right. 'Reference context' is set to your 'Business Profile' so the post matches your brand.
Pick a 'Post type': 'Update', 'Offer' or 'Event'. Then choose a 'Visual creation method', such as an AI-generated image, an AI-generated carousel, your own images, before and after images, or a Google review turned into a post. Google posts use photos, not video. Finally, pick a 'Post objective', such as educating your readers, a promotion or sharing an update.
Add your topic and a button
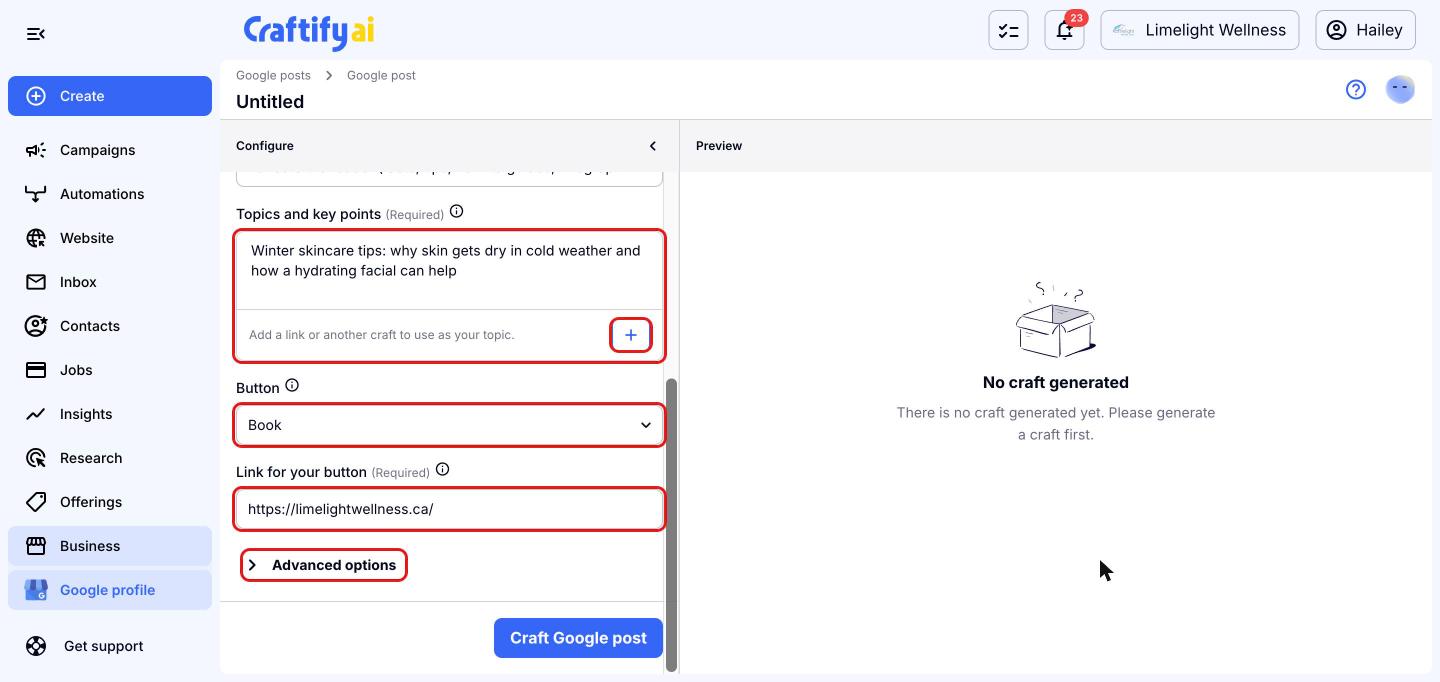
Under 'Topics and key points', type what your post should be about. You can also click the + button to add a link or another craft to use as your topic.
Choose a 'Button' for people to tap: 'Book', 'Order', 'Shop', 'Learn more', 'Sign up' or 'Call', or 'None' for no button. Add the 'Link for your button', such as your booking page. Open 'Advanced options' to set a target audience, SEO keywords, tone of voice and any additional instructions.
Craft, review and publish your post
Click 'Craft Google post'. Craftify AI writes your post and creates the visual, and you can leave the page while it works; you'll be notified when it's ready.
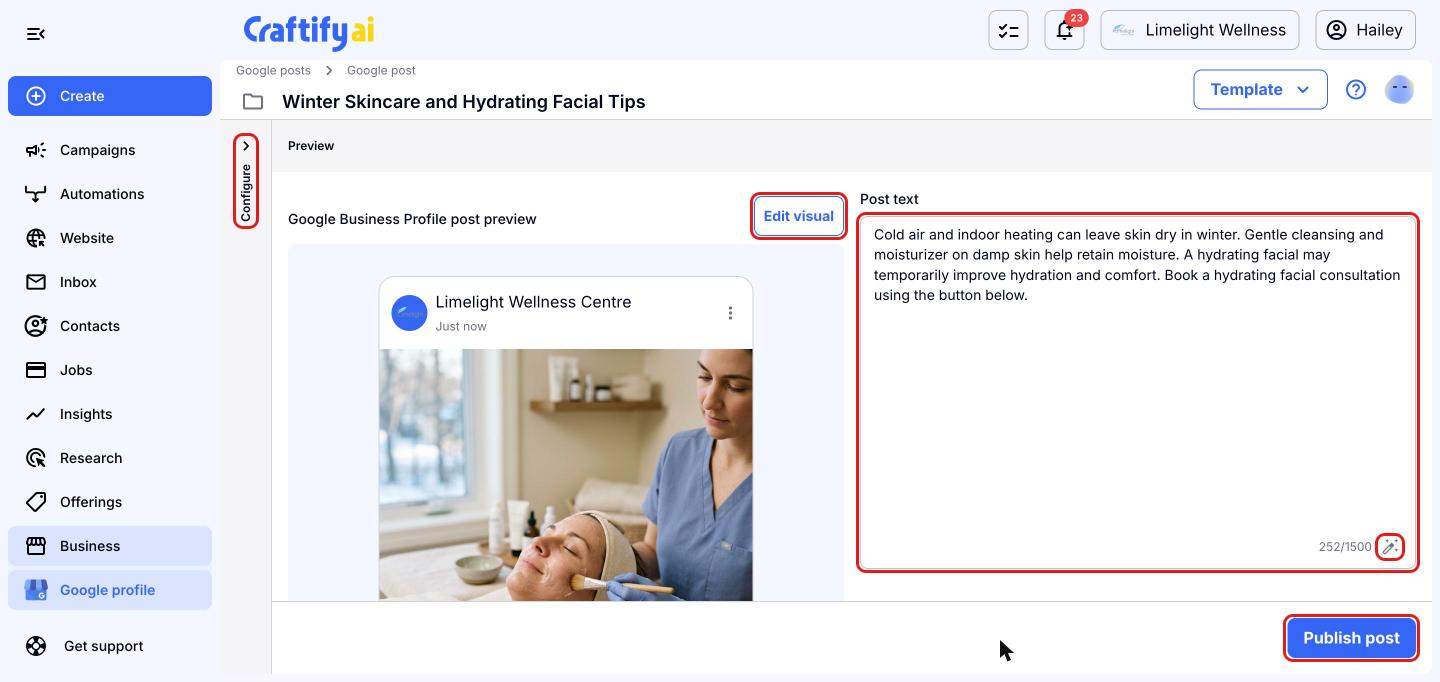
Your post opens with a 'Google Business Profile post preview' on the left and the 'Post text' on the right. Edit the text directly, or use the wand icon to improve it with AI, and click 'Edit visual' to change the image. To change your settings and craft again, click 'Configure' on the left. When everything looks good, click 'Publish post' to send it to your Google profile.